
🌍 Real-World Example: Deploying Terraform with Dagger
In the below example, we will create a Dagger pipeline that will deploy some Terraform code and we will see how useful being able to run CI/CD pipelines locally makes the development process.
🎯 Expected Outcomes
✅ Terraform initializes and validates the configuration.
✅ Infrastructure is provisioned automatically.
✅ The same pipeline can be executed locally or in CI/CD environments without modification.
🔨 Implementation
The below steps were taken to implement a CI/CD pipeline in Dagger that deploys Terraform. All the code for the below can be found here
Make sure you have the repo cloned and you are in the docs\dagger\terraform-example directory:
# Clone the repository from GitHub
git clone https://github.com/codetocloudorg/platform-engineering.git

# Change directory to the Terraform Dagger pipeline documentation folder
cd ./docs/dagger/terraform-example
Step 1: Create Terraform Files
First, we need to create the base Terraform configuration file that will deploy an Azure Blob Storage Account to an existing resource group. This will be our main.tf file in the root of the dagger folder.
terraform {
  required_providers {
    azurerm = {
      source  = "hashicorp/azurerm"
      version = "4.23.0"
    }
  }
}

provider "azurerm" {
  resource_provider_registrations = "none"
  features {}
}

resource "azurerm_storage_account" "example" {
  name                     = "daggertestingsa123"
  resource_group_name      = "dagger"
  location                 = "West US"
  account_tier             = "Standard"
  account_replication_type = "LRS"
}
Lets Daggerize this Terraform file!
Step 2: Initialize Dagger 🧑💻🗡️
Inside of the same Dagger directory, we are going to run a few Dagger CLI commands to get going:
# Initialize a new module at the given path
dagger init --sdk=python --source=./terraform_dagger_pipeine --name=platform_engineering
The above Dagger CLI command called init initializes the new module, and you will note we are passing through a few command line arguments:
- sdk: dagger makes available a few SDKs. They have support for Go, Python, TypeScript, PHP, and Java. In this case, we are using Python.
- source: source directory used by the installed sdk. In our case, we are asking Dagger to initialize in the ./terraform_dagger_pipeine directory
- name: name of the new module
All this together will create a new directory in our Dagger folder called ‘terraform_dagger_pipeine’ with some default configurations.
To get this working for our use case and deploy some Terraform code, we will need to make some configuration changes.
Step 3: Update the Dagger Configuration ⚙️
In the main.py file that was generated by the Dagger CLI (locate at: docs\dagger\terraform-example\terraform_dagger_pipeine\src\platform_engineering\main.py), we need to make some configuration changes to deploy our Terraform code. Before we do that, there are a few key concepts we need to understand. As mentioned earlier, we are going to deploy some Terraform code against an Azure resource group. There are a few things we need to consider to do this successfully.
Things to consider 🤔
- How will we securely store our secrets to authenticate to Azure?
- How will we provide Dagger the ability to run Terraform?
We can solve the first challenge by using Dagger Secrets. Let’s briefly explore how Dagger manages sensitive credentials securely.
Using Secrets in Dagger 🔒
Dagger supports the use of confidential information, such as passwords, API keys, SSH keys, access tokens, and other sensitive data in your pipelines. Instead of exposing secrets in environment variables or configuration files, Dagger provides built-in secret management, allowing us to:
- Store secrets securely in the host environment.
- Read secrets from files on the host system.
- Fetch secrets dynamically from external providers like 1Password and Vault.
For our use case, we will store Azure authentication credentials (client_id, client_secret, subscription_id, tenant_id) as Dagger secrets and inject them securely into our Terraform container. For local testing, you can set environment variables in your terminal. For example, in PowerShell, you can set the necessary environment varibales to execute Terraform like so:
$ENV:ARM_TENANT_ID = "your_tenant_id"
$ENV:ARM_CLIENT_ID = "your_client_id"
$ENV:ARM_CLIENT_SECRET = "your_client_secret"
$ENV:ARM_SUBSCRIPTION_ID = "your_subscription_id"
Running Terraform with Daggers Containerized Approach 🏗️
As for the challenge around ‘How will we provide Dagger the ability to run Terraform?’:
Since Dagger executes workflows in containers, we don’t need to install Terraform on our local machine or the CI/CD runner. Instead, we use the official hashicorp/terraform container image to ensure a consistent runtime environment. This approach provides several benefits:
✅ Eliminates Local Setup Hassles – No need to install or manage Terraform versions manually.
✅ Ensures Environment Consistency – The same Terraform version runs in development and CI/CD.
By leveraging Dagger’s containerized execution, we can run Terraform commands (init, plan, apply) inside a predefined, reproducible environment. This makes our pipeline more portable, repeatable, and platform-agnostic. 🚀
Dagger Python Implementation ⚒️
Here’s how we modify main.py to leverage Dagger Secrets and a Terraform Docker image to execute our Terraform:
from typing import Annotated
import dagger
from dagger import dag, function, object_type, Doc, Secret


@object_type
class PlatformEngineering:
    @function
    async def plan(
        self,
        source: dagger.Directory,
        client_id: Annotated[dagger.Secret, Doc("Azure Client ID")],
        client_secret: Annotated[dagger.Secret, Doc("Azure Client Secret")],
        subscription_id: Annotated[dagger.Secret, Doc("Azure Subscription ID")],
        tenant_id: Annotated[dagger.Secret, Doc("Azure Tenant ID")],
    ) -> str:
        """
        Runs `terraform plan` using Azure credentials stored as secrets.

        This function executes Terraform inside a container, securely passing in Azure authentication credentials.
        It returns the Terraform plan output for review.
        """
        return await self.run_terraform("plan", source, client_id, client_secret, subscription_id, tenant_id)

    @function
    async def apply(
        self,
        source: dagger.Directory,
        client_id: Annotated[dagger.Secret, Doc("Azure Client ID")],
        client_secret: Annotated[dagger.Secret, Doc("Azure Client Secret")],
        subscription_id: Annotated[dagger.Secret, Doc("Azure Subscription ID")],
        tenant_id: Annotated[dagger.Secret, Doc("Azure Tenant ID")],
    ) -> str:
        """
        Runs `terraform apply` to apply the planned changes using Azure authentication.

        This function first ensures Terraform is initialized, then executes the apply step.
        The execution is done inside a container, securely injecting the necessary secrets.
        """
        return await self.run_terraform("apply", source, client_id, client_secret, subscription_id, tenant_id)

    async def run_terraform(
        self,
        command: str,
        directory_arg: dagger.Directory,
        client_id: dagger.Secret,
        client_secret: dagger.Secret,
        subscription_id: dagger.Secret,
        tenant_id: dagger.Secret,
    ) -> str:
        """
        Runs Terraform (`plan` or `apply`) with Azure authentication.

        - Mounts the Terraform directory inside a Dagger container.
        - Injects Azure credentials securely as environment variables.
        - Executes Terraform commands (`terraform init`, then `terraform plan` or `terraform apply`).
        """
        terraform_command = ["terraform", command]

        # Add auto-approve if it's an apply command
        if command == "apply":
            terraform_command.append("-auto-approve")

        container = (
            dag.container()
            .from_("hashicorp/terraform:1.11")  # Use official Terraform image
            .with_mounted_directory("/mnt", directory_arg)
            .with_workdir("/mnt")
            .with_secret_variable("ARM_CLIENT_ID", client_id)
            .with_secret_variable("ARM_CLIENT_SECRET", client_secret)
            .with_secret_variable("ARM_SUBSCRIPTION_ID", subscription_id)
            .with_secret_variable("ARM_TENANT_ID", tenant_id)
            .with_exec(["terraform", "init"])
            .with_exec(terraform_command)
        )
        return await container.stdout()
How This Works 🔍
1️⃣ Securely Injecting Secrets 🔑
- Instead of using plain environment variables, we pass Azure credentials as Dagger secrets (
dagger.Secret). - This ensures that sensitive values (Client ID, Secret, Subscription ID, Tenant ID) are never exposed in logs or outputs.
- The secrets are securely injected into the container as environment variables when running Terraform.
2️⃣ Mounting the Terraform Directory 📂
- The Terraform configuration files (stored in
source: dagger.Directory) are mounted inside the container at/mnt. - This allows Terraform to access all necessary files while keeping everything isolated and reproducible.
3️⃣ Executing Terraform Inside a Container 🚀
- The pipeline runs Terraform inside a containerized environment using the official
hashicorp/terraform:1.11Docker image. - Dagger exposes a type called
Containerthat represents the state of an OCI-compatible (ie: Docker) container. This is passed to the Dagger Engine and is passed to a Dagger Function’s code as if it were just another variable. -
It performs the following steps:
- Initializes Terraform with
terraform init - Runs either
terraform plan(for previewing changes) orterraform apply(to make changes live) - For
apply, we add the-auto-approveflag to automate the process
- Initializes Terraform with
By using Dagger, we ensure that Terraform runs consistently across different environments, whether on a local machine or in a CI/CD system.
Now, let’s test it locally before pushing it to GitHub! 🚀
Step 4: Running the Dagger Pipeline Locally 🧑💻
To execute our Dagger pipeline locally, we can leverage the Dagger CLI again this time using the call command. This will call one or more functions, interconnected into a pipeline. In thise case, we are calling our plan function defined above in our main.py file. This will run a Terraform plan for us that will echo the changes to be made in our Azure resource group. In this case, a new blob storage account.
dagger call plan --source=. --client-id="ARM_CLIENT_ID" --client-secret="ARM_CLIENT_SECRET" --subscription-id="ARM_SUBSCRIPTION_ID" --tenant-id="ARM_TENANT_ID"
You will note we are passing through a few command line arguments being used here:
- source: source directory used by the installed sdk. In our case, we are asking Dagger to initialize in the ./terraform_dagger_pipeine directory
- env vars: all of the required environment variables to enable Terraform to connect to Azure
The output of that command will be similar to the below:
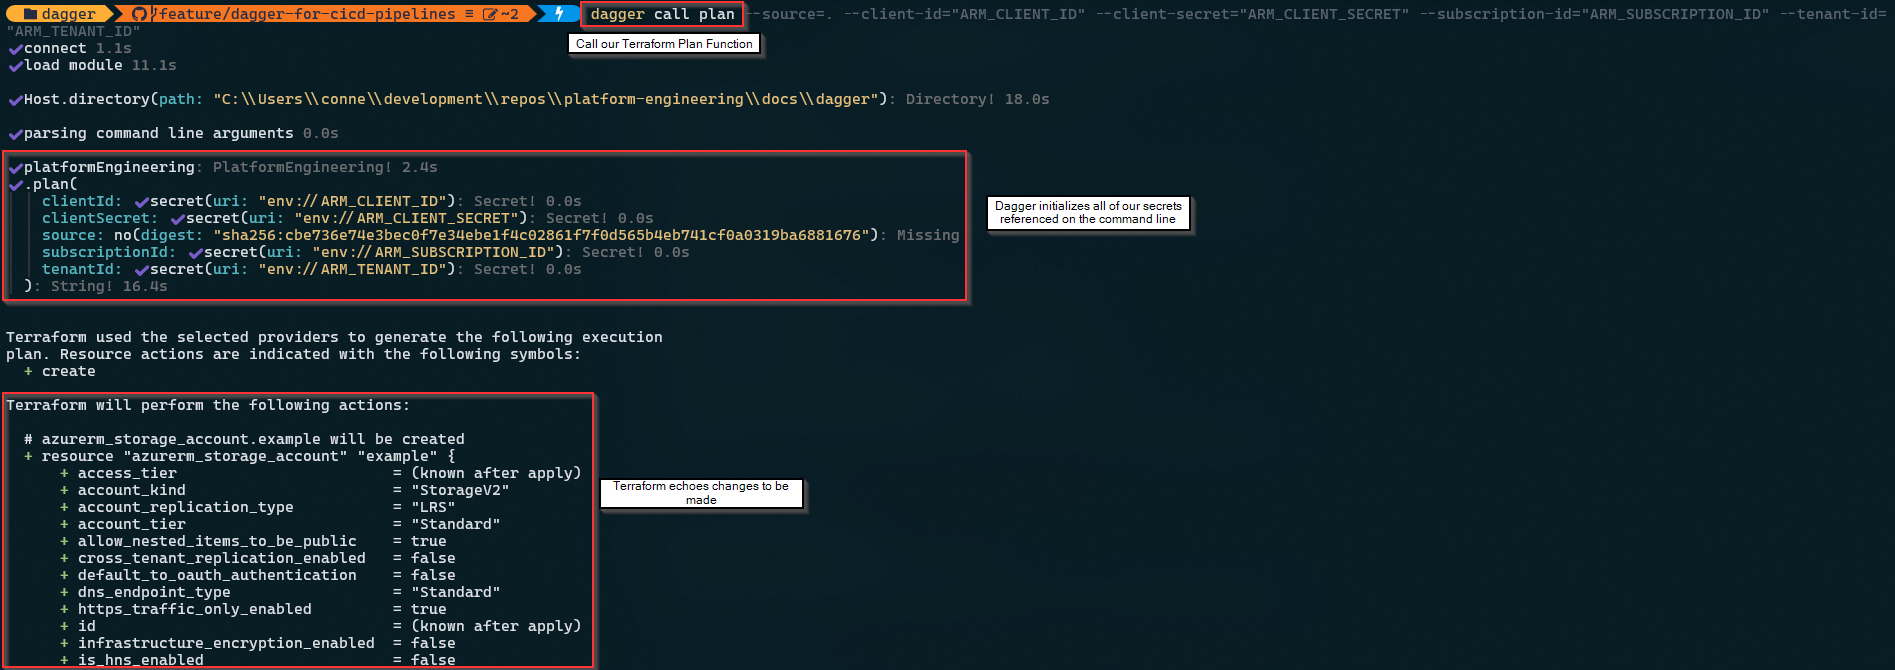
The output of the plan is looking good and has all the changes I would expect based on our Terraform file. Instead of running the apply locally, lets get our existing functionality into GitHub actions and run our pipeline there!
Step 5: Running our Dagger Pipeline in GitHub Actions 🐙
Now that we have successfully executed our Dagger pipeline locally, it’s time to automate it in a CI/CD environment. This will ensure that our Terraform deployments are consistently executed whenever code is pushed to our repository.
We will use GitHub Actions to automate the execution of our Dagger pipeline. Below is a sample workflow file that runs Terraform inside our Dagger container whenever changes are pushed to the repository (the location of this file is .github\workflows\dagger_terraform.yml).
name: dagger_terraform  # Name of the workflow

on:
  push:
    branches: [main]  # Trigger workflow on pushes to this branch

jobs:
  dagger-plan:
    runs-on: ubuntu-latest  # Define the runner environment

    env:
      # Set Azure authentication secrets as environment variables
      ARM_CLIENT_ID: $
      ARM_CLIENT_SECRET: $
      ARM_SUBSCRIPTION_ID: $
      ARM_TENANT_ID: $

    steps:
      - name: Checkout repository  # Fetch the repository code
        uses: actions/checkout@v4

      - name: Install Dagger CLI  # Download and install the Dagger CLI
        run: |
          curl -fsSL https://dl.dagger.io/dagger/install.sh | BIN_DIR=$HOME/.local/bin sh
          echo "$HOME/.local/bin" >> $GITHUB_PATH  # Add Dagger to the system PATH

      - name: Run Dagger plan  # Execute the Dagger plan command
        working-directory: docs/dagger
        run: |
          dagger call plan --source=. \
            --client-id=ARM_CLIENT_ID \
            --client-secret=ARM_CLIENT_SECRET \
            --subscription-id=ARM_SUBSCRIPTION_ID \
            --tenant-id=ARM_TENANT_ID

  dagger-apply:
    runs-on: ubuntu-latest  # Define the runner environment
    needs: [dagger-plan]  # Ensure 'dagger-plan' job completes before running this job
    environment: dagger_prod  # Use the 'dagger_prod' environment

    env:
      # Set Azure authentication secrets as environment variables
      ARM_CLIENT_ID: $
      ARM_CLIENT_SECRET: $
      ARM_SUBSCRIPTION_ID: $
      ARM_TENANT_ID: $

    steps:
      - name: Checkout repository  # Fetch the repository code
        uses: actions/checkout@v4

      - name: Install Dagger CLI  # Download and install the Dagger CLI
        run: |
          curl -fsSL https://dl.dagger.io/dagger/install.sh | BIN_DIR=$HOME/.local/bin sh
          echo "$HOME/.local/bin" >> $GITHUB_PATH  # Add Dagger to the system PATH

      - name: Run Dagger apply  # Execute the Dagger apply command
        working-directory: docs/dagger
        run: |
          dagger call apply --source=. \
            --client-id=ARM_CLIENT_ID \
            --client-secret=ARM_CLIENT_SECRET \
            --subscription-id=ARM_SUBSCRIPTION_ID \
            --tenant-id=ARM_TENANT_ID
This workflow ensures that infrastructure changes are reviewed before they are applied. The dagger-plan job runs first and outputs the Terraform plan. Once someone reviews the plan, they can approve the exection of the dagger-apply job. The dagger-apply step uses a protected environment (dagger_prod) to ensure deployments follow a controlled process.
After running the apply, an Azure Blob Storage Account will be deployed to your resource group! 🎉
🎯 Final Outcome
✅ Every push to main will trigger a Terraform plan.
✅ Changes to infrastructure are reviewed before applying.
✅ The main branch automatically provisions infrastructure using Terraform.
✅ An Azure Blob Storage Account is deployed.
By integrating our Dagger pipeline into GitHub Actions, we ensure that our Terraform deployment process is efficient, repeatable, and secure! 🎉